 Raise your hand if you have shoulder pain. Keep raising it. Where is the restriction?
Often, there is an impinged feeling in the inner part of the shoulder as you start reaching up toward the ceiling. Sometimes, there is an accompanying restriction or limitation in movement elsewhere. But here’s the thing—the first movement we lose is reaching overhead toward the ceiling. Why? At some point, we stopped hanging from monkey bars, playing on the playground, climbing trees, and hanging from branches.
This is a normal and healthy functional part of the shoulder, but as we stop using it, we lose it.
I have found that slowly regaining full overhead reach is the best way to heal and mend just about all shoulder issues. If you’re searching for effective shoulder pain relief, this practice will help you regain a full range of motion while simultaneously healing your shoulder. It does no good to regain movement if you do not heal, mend, remodel, restore, and even cleanse arthritis along the way. That is what Avita is all about.
You cannot restore and mend if you try to push against gravity—it doesn’t work. The bones and joints need more time and calm, steady compression. Simply pushing weights is not going to help. If you enjoy a strengthening program, keep doing it, but let Avita be a deeper, more direct way into bone and joint health.
Let’s get started!
The Practice
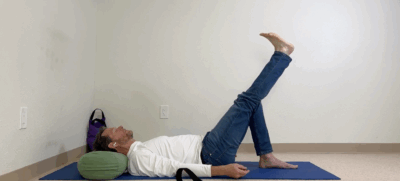
Lie on your back, knees bent, and head on a bolster. A bolster or firm cushion can provide support for your head. A foam block would also work.
- Begin with relaxation:
- Hands down by your sides.
- Take a moment to settle.
- Float your arms toward the ceiling (Frankenstein-style).
- Hands and arms reaching up.
- Close your eyes.
- Relax your arms.
- Feel the weight of your arms sinking into the shoulders, into the floor.
Reach your arms toward the ceiling and spread your fingers.
- Feel the shoulder blades widen.
- Your upper back broadens.
- Spread the fingers and open the thumbs.
- Extend the elbows.
Sometimes, restrictions are brought to light in a simple shape like this. Because gravity is on your side, you can sustain the movement without too much effort.
- Reaching the ceiling, slowly arc your hands overhead toward the floor behind you.
- Keep relaxing your belly and back down, as there is a tendency to arch back when you reach.
- Press the feet slightly against the floor to encourage the lower back and belly to relax toward the floor.
It is pretty important to keep that allowance happening as you slowly lower. Let’s say one arm bumps into some restriction sooner. Stop and let it be with the restriction or the impingement; the arm that has more mobility may keep going. So, you are not looking for symmetry. You are just looking to give each shoulder the healthy compression and love that they really crave.
The whole time, your fingers are spreading, the thumbs are opening, and the elbows are extending, which means the triceps are engaged. You are reaching toward the wall behind.
Bumping into Restriction
You cannot emphasize enough the importance and willingness of bumping into the restriction, spending some time with it, sometimes one and a half to two minutes or even three minutes. Kindly and sustainably look at the fear, all the worry, and the concern. Do not make it painful; you will know the sensation is healing when it brings a sense of peace, and sometimes, the pain even diminishes as you spend little time in the shape. You are not looking for symmetry; you are looking for feedback and spending time with it.
When the time is right:
- Slowly float the arms toward the ceiling.
- On the way up, you diminish the effort.
- Let the shoulder head sink down toward the floor as you stand the arms back up.
- Relax your belly, jaw, and face.
- Once the arms are perpendicular to the floor, maintain the shape with the least effort.
It is deeply relaxing for the musculature and soft tissues, and it lets the bones come into gentle contact, where that pressure is cleansing and restoring.
Elbow Hold Variation
- Bend your elbows and take hold of each elbow.
- Take hold of each elbow, and make an effort to get the tip of each elbow into the center of each palm.
- It might not be perfect, but make the effort and squeeze your elbows. Now, instead of open hands, you have closed hands, and you feel your fingers and thumbs squeezing the elbows.
- Firm your grip. Do not let it slip.
- Press your elbows toward the ceiling.
- Slowly lower your arms overhead.
- Make a big sweeping arc with your forearms.
- Keep your grip firm.
- Press your feet lightly onto the floor.
- Let your lower back and belly melt down toward the floor.
- Reach up and away.
You are looking for a restriction. You are not necessarily strengthening. Because of the grip on each elbow, whichever shoulder comes into the sensation first determines the stopping point or the slowing down. Move at a glacial pace when you bump into restriction.
You are still firming the grip and reaching for the wall behind. The head is heavy, there is a press in the feet, and the belly is relaxed because shoulder restrictions often come with patterns that can extend down into the torso and lower back. You want to unwind all those patterns. You have not yet adjusted the grip; it is still steady.
The grip highlights the shoulder restriction. If you let your grip slip, you miss the opportunity to expose the restriction and give it healing time.
When the time is right:
- Reduce the pressure
- Slowly bring your arms back up with less effort.
- Let the shoulders sink toward the floor.
- When you feel the arms perpendicular to the floor, let them rest a moment
Switch the Cross of Your Forearms
This variation will feel slightly more awkward and require a bit more effort to get the tip of the elbow in the center of each palm, but once you do that, you firm your grip and do not let go.
- Broaden the shoulder blades.
- Press toward the ceiling. A little press into the floor helps release the lower back and belly
- Press toward the ceiling.
- Squeeze the elbows,
- Arc overhead.
- Arcing, reaching and welcoming all the feedback.
Is it a feeling of weakness? A disintegrated feeling where one shoulder does not move the same as the other one? Is it shaky or uncertain? All that feedback is welcome, so do not rush through any of it.
This is how the nervous system, musculature, and even the proprioceptors deep in the fascia—everything—have to reorganize.
You might get a sense of how deep and powerful the practice is and how relaxing it can be. With a peaceful mind, anything is possible. It is with a quiet mind that you can heal.
You can time it; more importantly than timing, it is an intuitive feeling.
- Start raising the arms, allowing the shoulder heads to sink into the floor.
- Slowly raise the arms back up.
Whenever you get into something interesting, that is where you stop—slow down—it is valuable.
- Pause momentarily, with the hands and arms more perpendicular to the floor.
- Relax your belly, feet, and rib cage, then release your hands.
For visual guidance of these shapes and more, watch this video.
Final Resting Position
- Rest your arms at your sides, palms up.
- Savor the peace.
- Savor the healing.
- Roll onto one side and push yourself up.
- Lean against a wall.
- Sit comfortably.
- Close your eyes.
Reaching the bones is just a hop, skip, and jump to the parasympathetic nervous system, where all healing begins.
Let’s not let words get in the way of healing.
Namaste
Jeff ❤️