 Healthy feet are the foundation of a pain-free body, but there’s one movement that makes a massive difference—and most people don’t even realize they’re losing it. If you lose this key movement, you’re at risk of knee and hip pain. What is that one movement, and can you maintain it?
That’s what this article is about.
So, what is this movement I’m talking about? It’s called ankle dorsiflexion—the ability to bring the top of your foot and toes toward you. It’s only about 10 degrees of movement, but it’s vital. Why?
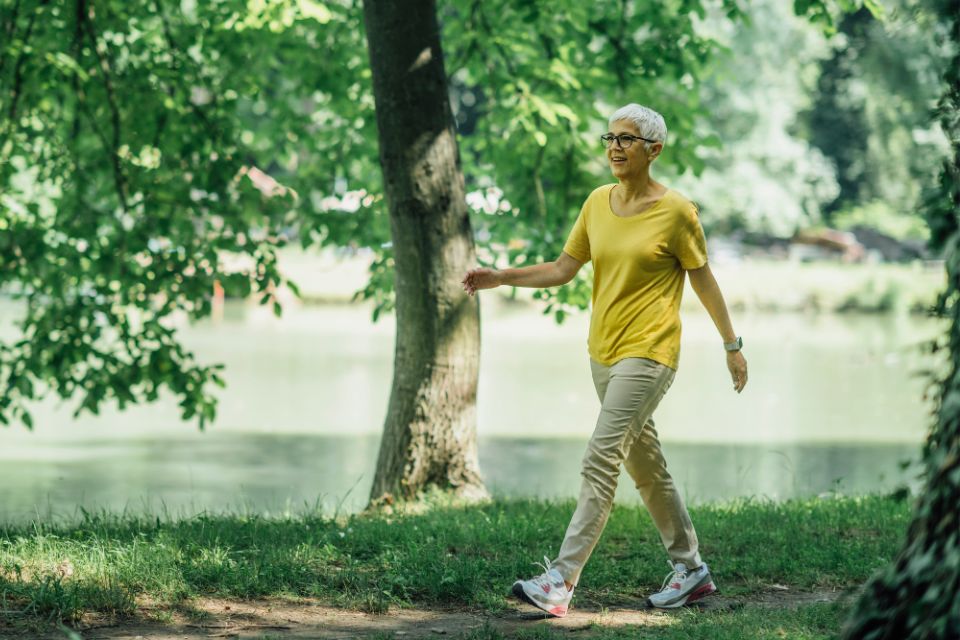
Because we need that movement to bring the foot forward as we walk. If we can’t dorsiflex the ankle, we risk stubbing the toe or catching it on some stairs and falling. When we stride, there’s a moment on the back foot where, for an instant, we have ankle dorsiflexion. It’s essential on the carry-through as well to have a good, healthy stride. That’s reason number one.
The second reason is the ability to squat—or sit in a chair. As your knees bend, they move toward the toes and the ankles dorsiflex. That is the requirement for squatting or sitting.
The third reason this is so important is that rigidity in the lower part of the body gets pushed up into the upper part. I call it the trickle-up theory. If you have limited movement in your feet and ankles, you will be required to walk more cautiously, and your stride will be limited, which will impact the hips and knees.
So, how do you maintain or regain ankle dorsiflexion? Let’s explore shapes to help.
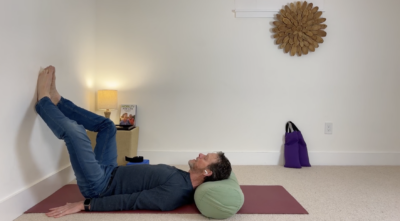
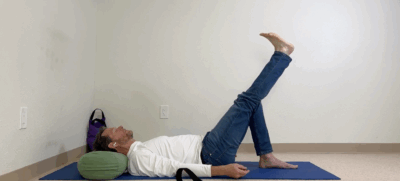
1. Legs Up the Wall
This is one of my favorite shapes; you’ll need a 6-foot strap, scarf, or belt.
- Sit near the wall, then roll back and swing your legs up.
- Support your head with a bolster or firm cushion.
- Keep the knees extended with the least amount of effort. This means positioning yourself about 10–12 inches away from the wall with the tailbone resting on the floor.
This shape alone helps with the knees’ passive extension. We want every joint of the body to have its full range of motion actively and passively, so right now, the knees are extending passively.
- Put the strap around the ball of one foot—over the base of the big toe and little toe.
- Hold the strap up high, keep arms straight and shoulders relaxed.
Here, you can close your eyes and feel the passive impact of the strap and the weight of your arms on your leg. You may feel a release in the back of the lower leg, even extending up into the knee. After about a minute or so passively, engage the muscles in the front of the lower leg—your shins—and bring your toes and foot toward you.
You are not pulling on the strap; the weight of your arms is enough. Use your eyes to watch the movement and see what is happening. Is your ankle flexing the way you want it to?
Active Engagement and Ankle Dorsiflexion
After about a minute and a half, switch to the other side, put the strap to the ball of the other foot, and repeat. If your hands tire, you can wrap the strap around your hands. The aim here is to have the weight of your arms drop down through the ankle and down through the bones of your leg. Bring the toes toward you, keeping the heel centered on the wall, actively engaging ankle dorsiflexion, and sustaining it.
You need to sustain the movement to get the release in the back of the leg, cleanse the joints, and fortify them.
Hold the shape for 1 to 1.5 minutes.
When the time is right:
- Release and set the strap aside.
- Bend your knees.
- Roll onto one side and push yourself up.
Watch this video to learn the healing power of Legs Up the Wall shape and explore its amazing benefits!
2. Standing Wall Shape:
Let’s transform the previous movement into a practical standing position. A sandbag works well here, but a folded beach towel or dense blanket will also do. You need 2–3 inches of elevation.
- Start with the left foot. Step onto the sandbag with the front half of the left foot. Keep the heel on the floor.
- Position the right foot back to look like a freeze frame in a regular everyday walking movement, but you pause here.
- Straighten the knees and level your pelvis with the floor. Stand tall through your spine.
- Step forward with the right foot a few inches while keeping your hands on the wall for balance.
- Gradually bring the back foot closer to the wall.
- Firm your thighs, and if all is good, you can step forward so your feet are in alignment.
- Hands are still on the wall, supporting the shape.
Deepening the Movement and Finding the Release
- Close your eyes. Squeeze the muscles in your legs. Feel for your bones and feel the dorsiflexion of the left ankle.
- Hold for a couple of minutes, then release the shape.
Shift the sandbag to the other side, the right foot. You can increase the height of the sandbag or the material you are using, but don’t increase the intensity so much that you can’t sustain the shape with a healthy healing sensation.
- Step onto the sandbag with the right foot heel on the floor.
- Check in, and if it is doable, keep stepping forward until the toes are in alignment, then firm the thighs.
Feel the release in the back of the leg and compression in the front of the leg. Relax the toes and welcome your ankle’s compression and healthy dorsiflexion.
Again, hold the shape for 1 to 2 minutes. When the time is right, step away and have a little walk. Just walk and feel.
Can you feel the push off your toes? Can you feel the follow-through of each step?
3. Squat Shape
The squat is a significant barometer for overall body health. Sitting in a chair is a partial squat—it doesn’t offer the full range of motion for the knees, hips, or ankles.
To work on your squat mobility:
- Sit on a bolster or a low chair.
- Gradually bring your heels closer to your body.
- Use the wall or props for support if needed.
Developing mobility to squat is essential for hip, knee, ankle, and abdominal health. Just because squatting is difficult does not mean that you should not approach it thoughtfully and consistently. Meet yourself where you are and develop the mobility over time.
Squatting was never in my practice, but I did everything that I’m telling you about here and developed mobility and health along the way. Don’t give up. Meet the resistance and work with it.
With time and practice, your squat, walk, balance, and mobility improve, and your chances of hurting yourself begin to drop.
Good things come with time and practice.
Watch this video for clear, step-by-step visual guidance on each shape we explored.
Final Thoughts
I hope this makes sense to you and encourages you to practice. It only takes 2–3 times a week. Consistency is key. I practice 3–4 times weekly, which I recommend, though I’ve seen people get results with less.
Namaste.